Flutter Video UIKit helps you develop a Video UI quickly without having to read through vast Flutter SDK Documentation and handling all complexities that comes along the development process. It provides easy way to get started with a Video UI for Hybrid Apps.
Table of Contents
Overview
Flutter Video UIKit simplifies the integration of video capabilities into your hybrid app. This powerful framework for Flutter-based video application development offers extensive customization options to meet various requirements.
You code less, only 3 lines of Code does all the magic of getting a video communication done. Thus, using UIKit helps you get a seamless Video UI with all Device Support in almost 99% reduced effort and time.
What’s new with Fluuter UIKit v1.2?
- Works with Low Code: iOS UI Kit now works with your Low Code settings configured using Visual Builder through Portal.
EnxVideoViewClass()is modified to accept extra key for Low Code URL. - File Share: Users can now share files among everyone or private with other specific users in-session.
- Participant List: Configuration options for Participant List.
How to use Flutter Video UIKit?
In your Flutter application, add the enx_uikit_flutter as a dependency inside your pubspec.yaml file.
enx_uikit_flutter: ^1.0.0
Note: Add below line in for Android frameworks:
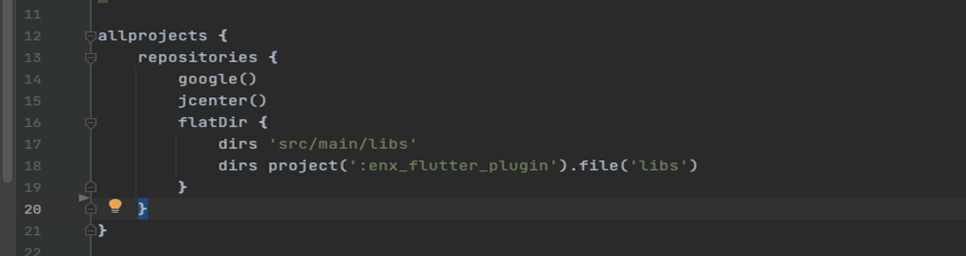
Go to project level build.gradle within all project section
Define Device Permissions
enx_uikit_flutter requires camera and microphone permission to start video call.
For Android: Open the AndroidManifest.xml file and add the required device permissions to the file.
<manifest>
...
<uses-permission android:name="android.permission.CAMERA" />
<uses-permission android:name="android.permission.INTERNET"/>
<uses-permission android:name="android.permission.CHANGE_NETWORK_STATE" />
<uses-permission android:name="android.permission.MODIFY_AUDIO_SETTINGS" />
<uses-permission android:name="android.permission.RECORD_AUDIO" />
<uses-permission android:name="android.permission.BLUETOOTH" />
<uses-permission android:name="android.permission.BLUETOOTH_ADMIN" />
<uses-permission android:name="android.permission.WAKE_LOCK" />
...
</manifest>
For iOS: Open info.plist and add:
- Privacy: Microphone Usage Description, and add a note in the Value column.
- Privacy: Camera Usage Description, and add a note in the Value column.
How to get Camera and mic permission in Flutter?
Create common method for permission:
Future<bool> handlePermissionsForCall(BuildContext context) async {
  Map<Permission, PermissionStatus> statuses = await [
    Permission.camera,
    Permission.microphone,

  ].request();

   if (statuses[Permission.camera]!.isPermanentlyDenied) {
    showCustomDialog(context, "Permission Required",
        "Camera Permission Required for Video Call", () {
          Navigator.pop(context);
          openAppSettings();
        });
    return false;
  } else if (statuses[Permission.microphone]!.isPermanentlyDenied) {
    showCustomDialog(context, "Permission Required",
        "Microphone Permission Required for Video Call", () {
          Navigator.pop(context);
          openAppSettings();
        });
    return false;
  }

  if (statuses[Permission.camera]!.isDenied) {
    return false;
  } else if (statuses[Permission.microphone]!.isDenied) {
    return false;
  }
  return true;
}

void showCustomDialog(BuildContext context, String title, String message,
    Function okPressed) async {
  showDialog(
    context: context,
    barrierDismissible: false,
    builder: (BuildContext context) {
      // return object of type Dialog

      return AlertDialog(
        shape: const RoundedRectangleBorder(
            borderRadius: BorderRadius.all(Radius.circular(10.0))),
        title: Text(
          title
        ),
        content:  Text(
          message

       ),
        actions: <Widget>[
          FlatButton(
            child:
             const Text("OK"),
            onPressed: okPressed(),
          ),
        ],
      );
    },
  );
}
Call above method as per your requirements after creating token:
bool isPermissionGranted = await handlePermissionsForCall(context);
Follow next steps if Device Permission is granted.
Implementation
Prerequisite
To use the Enx_UIKit_Flutter Framework user must have the following:
- A valid Token to join the room.
- Camera Permission
- Mic Permission
Code a little
- Step#1: Go to your class and import the
enx_uikit_flutter
import 'package:enx_uikit_flutter/enx_uikit_flutter.dart';
- Step#2: Initiate
EnxVideoViewClass: You are to pass a valid Token and handle callback.
// embedUrl is optional, used to import settings of Low Code
EnxVideoView(token: token,  embedUrl: "Low Code Host URL”,
connectError: (Map<dynamic, dynamic> map) {
		`//Here is the reason,  will carry information about cause of error
		`print('connectError' + jsonEncode(map));
	},
	disconnect: (Map<dynamic, dynamic> map) {
		//Here is the reason,  will carry information about cause of disconnection
		print('disconnect' + jsonEncode(map));
	}
);
UI Customization
To Customize Bottom Option:
var setting = EnxSetting.instance;
 setting.createBottomOption(BottomOption.audio);
 setting.createBottomOption(BottomOption.video);
 setting.createBottomOption(BottomOption.groupChat);
 setting.createBottomOption(BottomOption.disconnect);
 setting.createBottomOption(BottomOption.cameraSwitch);
To customize Top Option:
var setting = EnxSetting.instance;
 setting.createTopOption(TopOption.userList);
 setting.createTopOption(TopOption.requestFloor);
 setting.createTopOption(TopOption.menu);
To customize Participant List: Use configureParticipantList() method to add different options against each participants in Participant List. Refer example below:
var setting = EnxSetting.instance;

// Show disconnect option against each participant
setting.configureParticipantList(ParticipantListOption.disconnect);

// Show private chat option against each participant
setting.configureParticipantList(ParticipantListOption.chat);
To create extra Button: Use createExtraButton() method to create a list of buttons to use with your own style.
var setting = EnxSetting.instance;
setting.createExtraButton([
	CustomMaterialButton(
		onPressed: () async {
		},

		child: Container(
			padding: const EdgeInsets.all(1.0),
			decoration: const BoxDecoration(
				shape: BoxShape.circle,
				color: Colors.blue),
			child: const Icon(
				Icons.visibility,
				color: Colors.white,
				size: 20)
		),
	)
]);
Features
- For Participants and Moderators
- Mute Self-Audio
- Mute Self-Video
- Switch Camera
- Switch Audio Device
- Group and Private Chat
- Participant List
- Switch Layout
- Disconnect Call
- For Moderators only
- Record Session
- Mute Room
- Mute Participant-Audio
- Mute Participant-Video
- Drop Participant from room